Showing posts with label sewing. Show all posts

Sunday, May 19, 2013

Attempting the Washi Dress

Washi

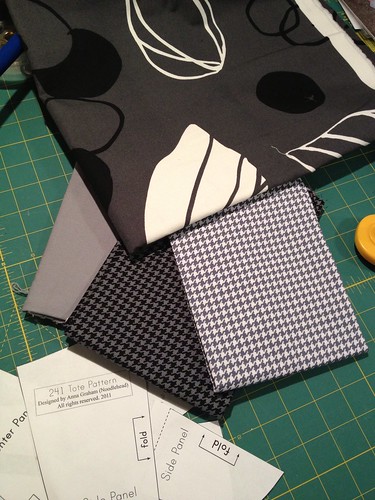
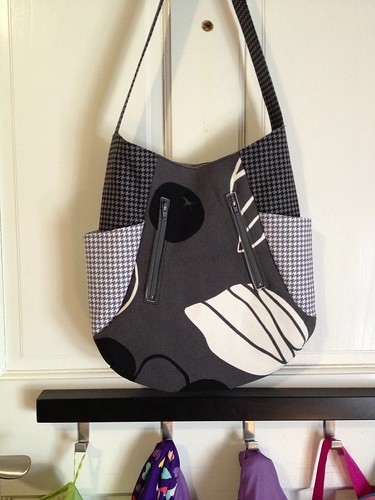
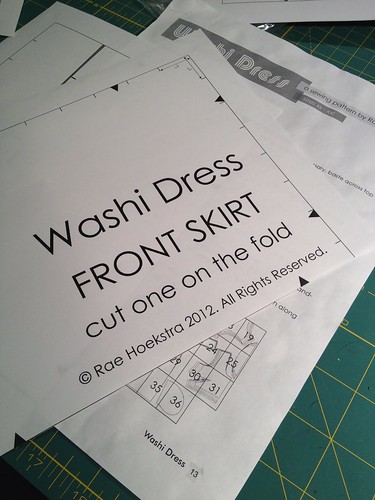
There are a few patterns that float around the blogosphere that you see so often that eventually you just need to try. That's how I ended up making Anna Graham's 241 Tote, my Wiksten Tova dress, and now the famous Washi dress, by Rae Hoekstra.

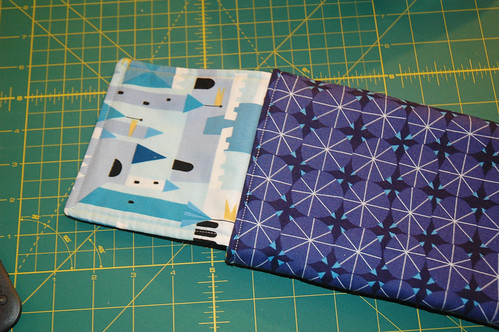
I bought some Anna Maria Horner linen, Parenthetical in Deep, for the occasion. It's such an amazing print. I may have to get more to use to make an Art Student Tote, the pattern for which I bought a few weeks ago. And I may have to get some of Parenthetical in the cream color, and make another dress...

My first attempt at the Washi was definitely a failure. With three out of four measurements I fall right between M and L, and then an M for the fourth. Per the pattern description, the measurements are supposed to be somewhat generous, so I started off making a muslin in M and put it on. Way too tight!

Take two and I went for L. Still way too tight. This was rather mystifying. My measurements are smaller than the range for L (even measured over the top of a lightly padded bra), and I'm only a B cup. Searching on Google and resource links on Rae's Washi page pointed me to a couple of blogs and resources. The description of issues that might require a Full Bust Adjustment (FBA) certainly sounded like the problems I was having, but being a B cup and using a pattern that was supposed to accommodate B-C cups, it didn't make sense. The next alternative was moving the darts down and adding some length to the bodice. As that was the easier adjustment to make, I was going to attempt that first before the FBA.

While I was in the process of making those adjustments on the pattern and browsing Google to find other people's experiences I came across another blog post, Jen over at Made on the Couch in which Jen was having the same problems I was. She had found out that the problem was the pattern not having been printed at the correct scale. In her case it was 1/8" of an inch difference, which as she rightly pointed out isn't a lot on its own, but makes for a large difference over an entire pattern. I'd had the pattern printed by a friend at his job (I haven't owned a printer in a couple years), and while he'd supposedly printed it at 100%, it may have been the printer that just wasn't accurate. In my case, the difference was 1/16th of an inch. Not quite as big a discrepancy as Jen, but over the width of the front bodice, it adds up to 1 1/4 inch. Finally it made a lot more sense.

Once Jeff goes back to work and has access to the really nice and accurate printer there, I'll have him print the pattern again and will attempt Washi once more. In future I think I may also opt for a paper pattern rather than instant gratification if the option exists.

Wednesday, April 10, 2013

241 Tote

Following the completion of one bag, I started on another: a 241 tote for myself, from Anna Graham's (Noodlehead) now-internet-famous pattern. A while before I'd bought the pattern, I'd picked up a home dec/canvas fabric on a trip to Ikea (where I also got some of that awesome grey-on-white numbers fabric, and noticed they have 20" x 20" pillow inserts for $6.99, "Fjädrar", should I get around to sewing pillow covers).

For other fabrics I dug into my stash, some Michael Miller Mini Mikes houndstooth, black-on-grey and grey-on-white for the sides, side pockets and interior slip pocket, and some Kona Medium Grey for the interior and Kona Ash for the zip pocket linings. The zippers are from Etsy, the Zipit store.

Untitled

Anna's pattern is clear and the color photos are really helpful, especially if you're fairly new to bag making. I've found sewing bags can feel counter intuitive and a bit ass-backwards at times, though that could just be me. It should definitely not be held against the pattern that I had to redo some things and became fast friends with my seam ripper again. A lot of that has to do with my having gotten ahead of myself and wanting to go a bit too fast, or making some "DOH!" mistakes, and occasionally having made the mistake of trying to sew while both kids were home, awake and running amok. And being highly critical and wanting to redo some wobbly topstitching.

Untitled
Lieam daring me to move the bag.

Things I'd do differently (or, per pattern suggestions) next time: Make one half of the pocket lining in the same fabric as the exterior, or at least something that matches better. I hadn't really thought about it that much, but after installing the zippers, and the way that it can still let slivers peek through of the lining on the edges of the stitching, the light Kona Ash was a bit more noticeable than I would have chosen. If you look closely at the picture, you can probably see what I mean, little light grey slivers around the zipper.

241 in Ikea home dec

Another change I'd make would be to add some kind of interfacing to the strap if you're using quilting cotton, or to use either webbing or a sturdier fabric. The lack of interfacing just makes the strap feel very light and flimsy, and I prefer it to feel a little stiffer. This is totally up to your personal preference.

The 241 Tote pattern has prompted me to jump on the next blogging band wagon, Anna's new divided basket pattern. Miss Matilda could use some cute storage like this for her ponies, cars and Barbie accessories, so they don't all get lost in the huge toy storage box in the kids' room. And I could use one in my room for some of the bedside flotsam and jetsam. There's no bedside table, and a basket to store the Kindle and things like lip balm and hand cream in, so the cats don't knock it off the bed frame's edge would be helpful.

Thursday, March 28, 2013

Ending the Hiatus

Not long into 2013 I gave myself my first critical quilting injury. While trimming stars from my Wonky Stars/Sparkle Punch quilt, I zipped my rotary cutter across the top of the ruler, rather than alongside it, and ended up slicing off part of the tip of my left index finger. It was a planar cut that measured about 1/2" by 1/4" (but thankfully not too deep), so having it stitched wasn't an option, and it kept me out of commission for quite a few weeks while it healed.

It was pretty frustrating, as I had just been getting back into sewing after our move. However, a couple of days after the incident, Jeff surprised me by giving me something to dress up a different finger on my left hand, and gave me an engagement ring! So, in the coming months, there may be some wedding crafting going on.

In the past couple of weeks I've managed to get most of my star components done for the Wonky Star quilt, though every time I've tried to lay it out on the floor to figure out the layout, cats decide they need to run around it and mess up the components.

In the meantime I have also been working on some smaller projects. Last weekend I made a small backpack using the Fig Tree Quilts "Daisy Girl Backpack" pattern. Originally I'd gotten fabrics together to make one like on the cover, with Aneela Hooey's Sherbet Pips, but Miss Matilda decided later that she didn't really like those fabrics all that much, and as a project it just hit the "maybe later" pile. With one of Matilda's little pre-school friends moving to Singapore at the end of the month, I decided to make it as a going away present for her, one that would be a functional traveling gift.

Daisy Girl Backpack

Daisy Girl Backpack

Daisy Girl Backpack

I'm really happy with the end result, though I had a few issues with the pattern. My being a bit of a novice as far as sewing bags may have had something to do with it, but I found some instructions a little vague or confusing at times, and that could have been aided with more pictures, or clearer illustrations. There was also a mistake in the pattern with the slip pocket's measurements (folding a 7" x 13" piece in half is never going to give you 7" x 7" square). But, in the end it came out looking very nice, and the recipient was very happy.

Friday, July 15, 2011

Kindle Peeps

Back in May, my boyfriend Jeff gave me a Kindle for my birthday (most awesome birthday present ever!). Another friend, Kreestof, had pondered buying me a case for it, but as he wasn't sure what I'd like, he held off on doing so. With all the really fantastic fabrics out there, the idea to make my own had immediately come to mind, so I was glad he hadn't actually gone ahead with that plan.

Shortly after I got my Kindle, Jeff got himself one too. As my Kindle lives at home mostly, and his gets toted around a lot, his need for a case was much more immediate than mine, and just before he left to go to E3 in L.A. for work, we cobbled together a make-shift sleeve with some Alexander Henry Calaveras fabric, and a cloth pre-fold diaper that I re-purposed as batting. It wasn't entirely finished at the time, lacking anything to use as a closure, and it also lacked a lot of finesse, being a hastily sewn prototype, but it was functional and has housed his Kindle nicely for the past month or so.

The intention was to affix some Velcro as a closure and tweak some of the smaller issues, but plans changed slightly. I got a hold of some of Lizzy House's Castle Peeps fabric to make a Castle Treasury quilt. I showed Jeff the fabric and pattern, and asked if he would like to be the recipient of said quilt. He really likes Medieval stuff, fantasy, Lord of the Rings and all that kind of thing, so I had thought he'd be into that. In the meantime I'd found a PDF pattern on Etsy for a Kindle case... why reinvent the wheel, right? I'm not sure if he suggested using Castle Peeps for a Kindle case, or I did, but that's what ended up happening.

The batting I had ordered last week arrived yesterday, and I set to work last night. I adapted the pattern slightly to use Velcro instead of a button and loop closure (the latter is certainly easier).

Castle Peeps Kindle CaseMain body is the blue shields fabric, the lining, pocket and flap outer is in Castle Town.

Castle Peeps Kindle Case
The main body in blue shields, and the pocket. Velcro closure.

Castle Peeps Kindle Case
And the back!

Next I need to make myself one. I have some cute purple fabric with black cats, I think it was a Kaufman Halloween novelty print from some years ago. I might pair that with the charcoal Ghastly Bramble, or possibly the grey Ghastly Clover from the Alexander Henry Ghastlies collection. I need to dig up the fabrics soon and play around to see what works.

Tuesday, July 12, 2011

Starting With New

I'm not sure there are words to describe how much better sewing is with a machine that functions properly. It's so much easier! I'm not fighting to make the pieces go through straight now that I have a new 1/4" foot (after having to replace the one that came with the new machine due to being slightly bent). The feed dogs on this machine actually work properly, so things don't shift as much. I can finally sew without feeling all frustrated and on edge.

I'm very excited! It's nice not to feel constantly stressed while you sew, afraid that the inferior machine is bungling up your nice fabric, and that your quilt will, at the end, not be as awesome as you imagined because there are all these tiny mistakes constantly adding up to make the whole thing off.

The replacement foot didn't arrive until Friday, and I didn't get as much sewing done on the weekend as I would have liked, due to various social engagements, but I've managed to sew on my Flipside blocks a little yesterday and today:

Flipside Progress

That's roughly two-thirds of the way in, then I'll need to cut up the white sashing and such.

Thursday, June 30, 2011

No Sew

Today is a day without sewing. Mostly this is self-imposed, until tomorrow, when a new sewing machine should arrive!

My current sewing machine is at least about 7 or 8 years old, and was a very cheap and very basic Singer. It still works fine, however, it just isn't very good for me to piece quilts with. Back when I did some basic garment sewing, it did exactly what I needed it to. It has long been a discontinued model, and when I tried looking for a 1/4" foot not long ago (when I started quilting), I struck out. I've held off on buying a walking foot (and also a darning/quilting foot for it), given that I didn't really want to start spending money on purchasing an increasing number of accessories for this particular machine, one that I didn't especially like and wanted to replace.

It has a tendency to be somewhat iffy with the thread tension sometimes, and, lacking a 1/4" piecing foot, in order to get 1/4" seam allowance, I've had to tape painters tape on the plate as a guide. This works somewhat adequately, but isn't always as accurate, and it has become more than aggravating. Due to working on a quilt with many pieced strips and bits (Rachel Griffith's Flipside quilt), having the little inaccuracies pile up will compound into bigger issues. And, I'm just fed up of having to fidget and fudge and have less control over the process than I'd like. I don't think the feed dogs on this machine are ones that can be lowered, which would make quilting at home rather a nuisance too. I'm not sure the feed dogs feed entirely properly sometimes too, as I've had some issues with fabric shifting, even when I pin it to within an inch of its life.

So, a new machine is on its way. I went with a Janome DC2011. For me this is somewhat of an impulse buy, meaning that for once I didn't spend weeks researching and hemming and hawing and "only" took a few hours before deciding. I researched some reviews, but also decided not to look at every single brand and model, because I knew I'd end up driving myself crazy. This one was within my proposed budget, and also did the things I wanted it to. The reviews I found of it were all exceedingly positive, and written by people doing the things with their machine that I was intending to do with mine. Bonus!

Janome DC2011
Pink isn't exactly my color (and the only color option), but something I can live with!

It comes with a 1/4" and a walking foot included. I've ordered a darning foot separately, which should be here on Saturday. I'm very excited!